Mona Shield Payne / Special to the Sun
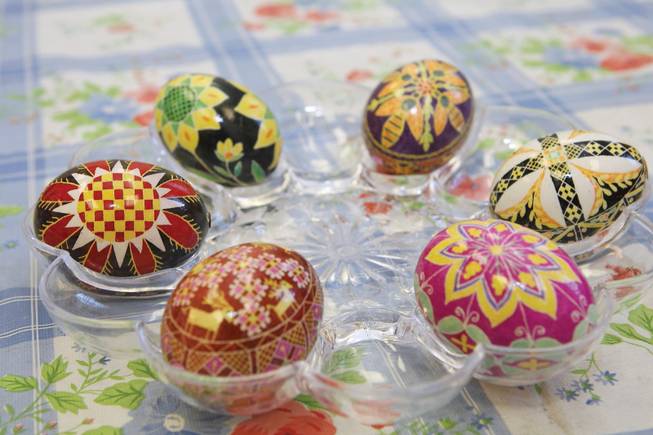
Colorful Ukrainian Easter eggs designed and hand dyed by Ukrainian instructor Joy Brittan are on display during a Pysanky craft class held at the Henderson Senior Center.
Sunday, March 29, 2015 | 2 a.m.
For many people, decorating Easter eggs amounts to buying a package of Paas dye at the grocery store and dunking a couple of eggs into a cup of dyed liquid.
But there are dozens of ways to get more creative, with methods that are both inexpensive and easy. Here are a few ideas.
Go natural
You don’t need artificial dye to color an egg. Look no further than your pantry or fridge. Purple cabbage, blueberries, coffee, spinach and beets, as well as spices such as turmeric and paprika, can color eggs naturally.
Ingredients
2 tablespoons your choice of spice
OR
2 cups chopped your choice fruit or vegetable
2 cups water
1 tablespoon salt
1 tablespoon vinegar
Directions
1. Boil the main ingredient and the salt in a small pot for about 10 minutes.
2. Pour the liquid into a Mason jar, add the vinegar and the eggs, and let soak for a few hours or overnight. The longer the eggs soak, the richer the resulting color will be.
Accessorize
Buy sticky googly eyes at a craft store to make egg people or pets. Draw, stamp or paint lips and ears. Using craft glue to make items stick, dress them in tissue paper clothes, use straws for arms and legs, and adorn with foam cutout hats or glasses. Tape small pieces of paper to toothpicks to make customizable signs for your new egg family.
Photo Prints
Egg on your face? Or face on your eggs?
Place a piece of tissue (the kind you use to wipe your nose) on a piece of printer paper and tape the border down completely. Place the paper in your printer and print so the photo image transfers to the tissue. Cut the image out, leaving only a tiny bit of white border, and separate the back layer of tissue if you are using two-ply. It should just fall away and leave you with a single sheet of tissue featuring your picture.
Use a small brush to spread Modge Podge on the egg and then lay the photo on top. Even out any wrinkles with your finger — be gentle! — and secure the edges with another layer of Modge Podge. Let dry.
These make great place markers for an Easter brunch or dinner.
Stickers
Place stickers on plain or dyed eggs for a themed look. Think “Frozen,” monster trucks or baby chicks. Buy letter stickers to spell names or words.
For a more sophisticated design, place simple dot stickers on your eggs or go for a geometric look by arranging black electrical tape around your eggs in graphic patterns.
Chalkboard paint
Paint your eggs with chalkboard paint, found at any home-improvement store, then decorate them using chalk or liquid chalk markers. Children and adults can personalize them with names or drawings.
If you mess up, just wipe the egg clean with a damp rag and start over.
Totem poles
Stack your eggs. Gather three or four decorated eggs. Make a small support mound using crafting clay and place a skewer standing straight up in the middle. Or drill a small hole in a wooden block and place the skewer inside. Make sure your base is large enough to support the weight of several eggs. Gently slide the skewer through each egg, stacking as many as will fit to cover the skewer.
Use similar eggs facing the same direction or alternate sizes and orientation: Skewer some bottom to top, others through their sides.
Wrap 'em
Use pastel embroidery floss for a sweet traditional look, twine for a rustic feel.
For these, styrofoam eggs are preferable. Use 1- to 3-inch tall eggs for hanging and hiding, larger ones to grace your mantle or table.
Insert a pin in one end of the egg and brush the area immediately around it with glue. Hook one end of the string around the pin and adhere it to the egg using the glue. Carefully wind the string around the egg in a single layer, using a small brush to apply glue periodically to small sections. Once the egg is half covered in string, flip it and repeat the process from the other end, until both sets of string meet in the middle.
*Unless otherwise noted, use cooled, hard-boiled eggs for these projects.

Join the Discussion:
Check this out for a full explanation of our conversion to the LiveFyre commenting system and instructions on how to sign up for an account.
Full comments policy